One windy afternoon last October, a gust of wind sent our empty recycling bin tumbling across the gravel driveway, scattering aluminum cans like a metallic trail of shame toward the neighbor's fence. It wasn't the first time, but standing there in the drizzle, chasing a stray milk jug across our half-acre, I realized our 'fixer-upper' charm was being systematically ruined by three mismatched plastic bins sitting in plain sight.
Heads up — this post has affiliate links. If you buy through them, I earn a commission at no extra cost to you. We only share plans and tools we have actually used on our own projects, like the ones that kept this enclosure from leaning toward the neighbor's yard. Full disclosure here.
The Great Bin Dilemma: Why 'Just Winging It' Failed Us
Living on a 0.5-acre lot in rural North Carolina sounds like you have all the space in the world, but somehow the trash cans always end up right where everyone can see them. We’re in that weird middle ground — not quite a deep-woods homestead, but definitely under the watchful eye of a somewhat relaxed (but still present) HOA. We needed a permanent enclosure, but the quotes we got from local contractors were eye-watering. One guy wanted nearly a thousand bucks for a basic cedar screen. For a trash can hideout? No thanks.
She spent a few nights scrolling through Pinterest, but most of those 'simple' DIYs were just three pallets screwed together. That works for some, but with the humidity here, pallets turn into termite hotels in about five minutes. We needed something with a real foundation and proper drainage. After our storage shed took three weekends instead of one, we knew we needed actual blueprints this time. That is when we found My Shed Plans. They have about 12,000 designs, and crucially, they had specific guidance for building on uneven ground, which is basically the only kind of ground we have in this part of the state.
Red Clay and Reality Checks
By mid-November, we were ready to break ground. If you’ve never dug into North Carolina red clay, imagine trying to shovel through a block of semi-dried sculpting clay mixed with river rocks. It’s a workout. We were aiming for the frost line, which sits around 12 inches deep in our area, to ensure the posts wouldn't heave when the ground froze. I remember the sharp, piney scent of freshly cut pressure-treated lumber mixing with the humid smell of damp red clay as we dug the post holes. It’s a smell that somehow represents every project we’ve ever started on this lot.
One thing we’ve learned the hard way (and we’ve had our share of DIY failures here in NC) is that for anything touching the dirt, you need pressure-treated wood rated for ground contact — specifically UC4A. We used 4x4 posts and set them in gravel for drainage rather than concrete, mostly because we wanted the enclosure to be breathable. The plans from My Shed Plans were a lifesaver here because they included a detailed cut list. If you've ever stood in the middle of a big-box hardware store trying to calculate board feet on the back of a receipt, you know why a pre-made list is worth its weight in gold.
The 96-Gallon Math Mistake
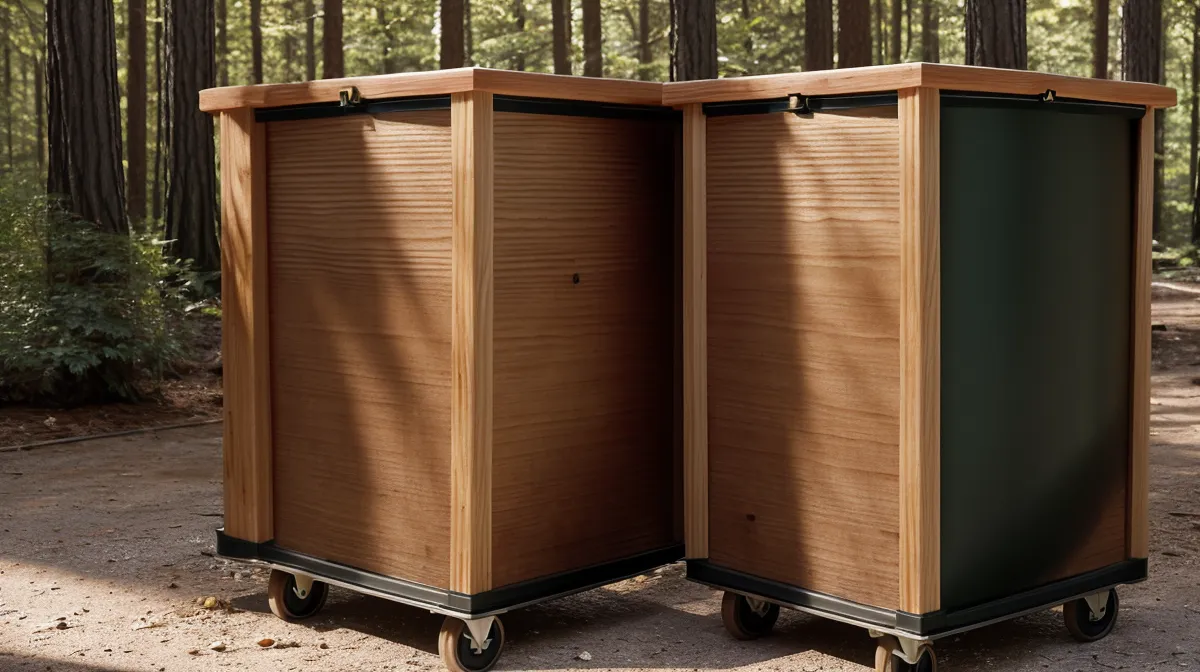
Things were going too smoothly. A surprisingly warm weekend in February arrived, and I decided to pre-cut all the cedar slats while she was working on the gate frames. I was in a flow, sawdust flying, feeling like a pro. Then I tried to dry-fit the first wall. I realized on a Saturday afternoon that I’d cut all the side slats for a standard 32-gallon bin instead of our actual 96-gallon monsters. Our municipal bins are about 46 inches tall, and I had measured for the little ones we used to have at our old apartment.
She just looked at the pile of short boards, looked at me, and handed me a beer. We ended up using those short boards for a smaller firewood rack later, but it was a humbling reminder that even with 12,000 plans at your fingertips, you still have to measure the stuff you’re actually putting *inside* the structure. We eventually switched gears and used some of the layout ideas from TedsWoodworking, which has 16,000 plans, to figure out a better slat spacing that allowed for airflow without making the bins visible from the street.
The HOA Angle: Building for Compliance
If you live in a deed-restricted community, you know the struggle. Most DIY plans focus on what looks good, but they don't always account for 'sightline regulations.' Our HOA requires that any external structure must match the 'architectural character' of the main house. For us, that meant cedar slats and a specific dark stain.
The beauty of using professional plans is that they are easy to modify for compliance. We adjusted the height to ensure the lids of our 96-gallon bins were completely obscured from the road, but kept the overall footprint small enough that it didn't count as an 'unauthorized outbuilding.' Most generic plans you find for free online are too tall or too flimsy to pass a strict ARC (Architectural Review Committee) inspection. Having a formal set of prints to show the board — even if you're just showing them the 'vibe' — goes a long way in getting those projects approved without a fight.

The Turning Point: Leveling the Playing Field
By early April, we were finally hanging the gates. This is usually the part where I start sweating because if the posts aren't perfectly plumb, the gates will sag and drag on the gravel. I spent a good twenty minutes staring at the level bubble perfectly centered between the lines and feeling like a master architect for exactly three seconds. It’s a fleeting feeling, but it’s the high every DIYer chases.
We used heavy-duty black steel hinges and a simple gravity latch. The moment of truth came when we swung the right-side gate shut. My partner’s silent, impressed nod when the gate latched with a solid, metallic 'clack' for the first time without dragging on the gravel was better than any 'good job' I could have asked for. We’d managed to build something that looked intentional, sturdy, and — dare I say — expensive.
What We Learned (The Hard Way)
- Account for the Slope: Even if your yard looks flat, it isn't. Always use a string level or a laser level before you set your posts.
- Mind the Hinges: 96-gallon bins are heavy, and the gates to access them need to be wide. Use three hinges per gate if you're using heavy cedar to prevent the wood from warping over time.
- Airflow is King: Don't make the slats too tight. Trash cans smell, especially in the North Carolina summer. A half-inch gap between slats is the sweet spot for hiding the plastic while letting the breeze through.
Final Reflections from the Driveway
Pulling into the driveway now feels like arriving at a finished home rather than a construction site. It’s funny how such a small project — just a simple box for the trash — can change the entire curb appeal of a house. We no longer have to worry about the wind turning our recycling into a neighborhood-wide scavenger hunt, and the HOA hasn't sent us a single letter about 'unsightly waste receptacles.'
If you’re tired of looking at your plastic bins but don’t want to blow your mortgage on a contractor, honestly, just get a good set of plans. Whether you dive into the massive library at TedsWoodworking or start with the foundation-heavy guides at My Shed Plans, having that roadmap makes the difference between a 'weekend project' and a 'six-month headache.' We’re already looking at the workshop plans for our next big disaster — I mean, project. If we can build this on North Carolina clay with a single level and a lot of stubbornness, you can definitely handle your backyard eyesores too.