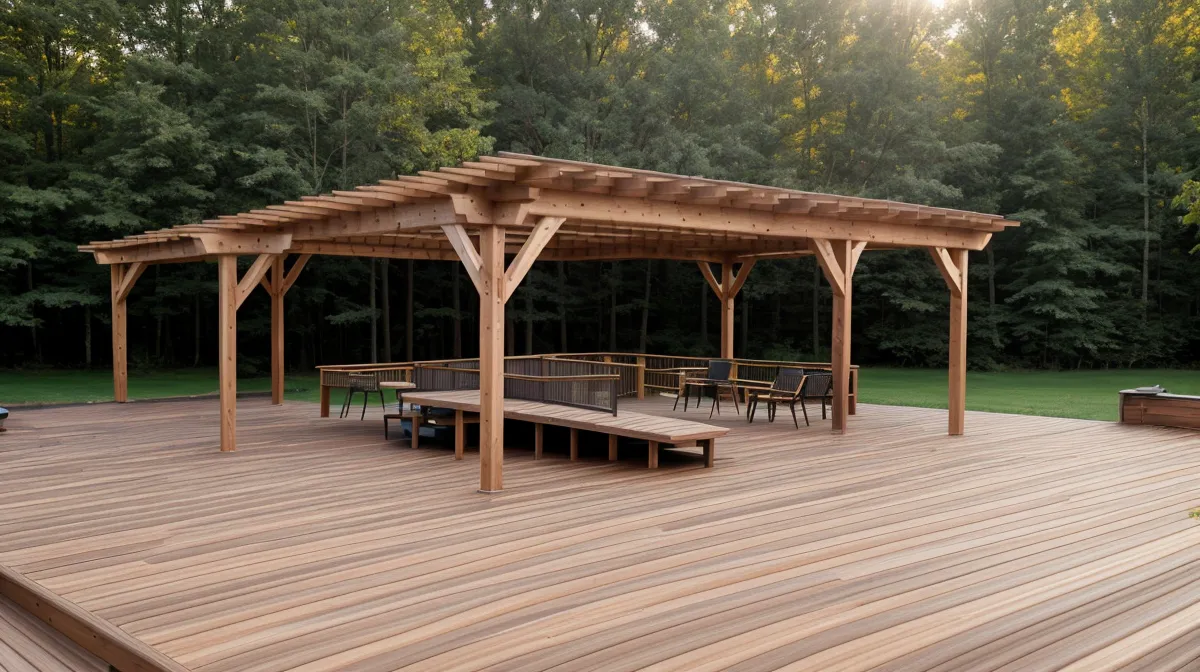
I was standing in the middle of our backyard this past January, holding a piece of paper that felt like a physical punch to the solar plexus. The contractor—a perfectly nice guy who spent twenty minutes measuring our back door while I tried to keep the dog from eating his boots—had just handed me an estimate for over eighteen thousand dollars. For a 16x20 raised deck. That is a lot of money for some wood and screws, especially when you have a mortgage that already feels like a hungry beast.
Before we dive into the mud and the miter saws, a quick heads-up: this post contains affiliate links. If you buy through them, I earn a commission at no extra cost to you. We only share plans and tools we have actually used and dragged through the North Carolina clay on our own projects. Full disclosure here: we’re still learning, but we’re learning with much better blueprints than we used to have.
She looked at the quote, looked at the mud pit where our 'future outdoor oasis' was supposed to be, and then looked at me. 'We could buy a decent used truck for that,' she said. 'Or, we could buy enough lumber to build a small village, get that new sliding miter saw you’ve been eyeing, and still have enough left for a proper vacation.' And that was that. The decision was made. We weren't going to hire it out. We were going to build it ourselves, even if it meant our neighbors got a front-row seat to us arguing over joist hangers for the next three months.
The $18,000 Reality Check (And Why We Said No)
He is usually the one who pulls the trigger on these projects, but I am the one who has to figure out if the stairs are actually going to meet the ground without someone breaking an ankle. When we realized that a professional contractor was out of our budget, the panic set in. We aren't architects. Our previous experience was basically a storage shed that took three weekends instead of one. A raised deck is a different animal—it is high up. If a shed falls over, your lawnmower gets a dent. If a raised deck falls over, you are having a very, very bad day.
We spent most of January 2026 researching. The biggest cost in that $18,000 quote wasn't the lumber; it was the labor and the 'peace of mind' of a professional design. We realized if we could find a blueprint that was already engineered for safety, we could cut that cost by more than half. That is when we really started leaning on TedsWoodworking. Having access to thousands of plans sounds like overkill until you realize you need a very specific 16x20 layout that accounts for a sliding glass door and the weird slope of a North Carolina backyard.

Why Good Plans Are Better Than Good Intentions
I will be honest—I wanted to just wing it. I figured, how hard can it be? You put some posts in the ground, you lay some boards across them, and you are done. She, being the sensible one, pointed out that I have never once measured a room and gotten the same number twice. She insisted on a real plan with a specific cut list. This is where we actually saved our first few thousand dollars. Using the detailed material lists from the deck plans, we were able to order exactly what we needed from the local lumber yard in one go.
No more 'oops, I forgot five more 2x10s' trips to the big box store. If you have seen our TedsWoodworking Review, you know we are big fans of anything that keeps us from driving back and forth to town four times a day. We ended up spending roughly low-four-figures on materials, including the pressure-treated wood, the concrete for the footings, and a hidden-fastener system she insisted on because she 'hates seeing screw heads.' Even with the cost of the plans and a new impact driver, we were still sitting at a savings of well over $13,000.
The Battle Against North Carolina Red Clay
If you live in rural NC, you know that our soil isn't actually soil. It is a prehistoric brick material designed to break shovels and spirits. We started digging the footings in late January. To meet local building codes, your footings have to be deep enough to stay below the frost line—and even though it doesn't get crazy cold here, the county inspector does not care about your excuses. He spent three days wrestling an auger that tried to dislocate his shoulders every time it hit a rock. I spent those three days checking the layout with a string line and a level.
This is the part no one tells you about DIY: it is 10% building and 90% moving heavy things and sweating in the cold. We learned the hard way that our yard has a 4-inch drop we didn't notice until the first two posts were in. We had to pull them, re-dig, and start over. Stubbornness, remember? It is our only real skill. It reminded me of the time we tried to turn our garden into a food-producing machine using the Self Sufficient Backyard guide—you realize very quickly that the earth does not want to be moved, but you just have to be more persistent than the dirt.
Framing: The Day I Almost Drilled Through the Kitchen Wall
By mid-February, we were ready for the framing. This is the 'Lego' phase of the project, or so I thought. Hanging the ledger board—the big piece of wood that attaches the deck to the house—is the most nerve-wracking thing I have ever done. You are literally drilling giant holes into your home's foundation. If you mess this up, you get water damage, or worse, the deck pulls away from the house during a BBQ. Not the kind of 'drop-in' guests we were looking for.
We followed the plan's instructions for flashing and lag bolts to the letter. This is not the place to get creative. We used high-quality galvanized hardware because the humidity here will eat cheap metal for breakfast. I remember standing on a ladder in late February, holding one end of a 16-foot beam, while she tried to hammer the other end into a joist hanger. It was 45 degrees, misting rain, and I am pretty sure we both said things we didn't mean. But when that beam slid into place and the level showed it was dead-on? That is a better feeling than any contractor's invoice.

The Joist Incident: A Mid-Build Meltdown
Every project has a 'dark night of the soul' moment. Ours was on a Tuesday evening in March. We had just finished installing all the joists—the ribs of the deck—and I stepped back to admire our work. Something looked... off. She grabbed the tape measure. 'Honey,' she said, her voice way too calm. 'Why are these spaced at 24 inches on center?' The plans explicitly called for 16 inches. I had gotten into a rhythm and just... kept going.
Because we were using composite decking, the joists needed to be closer together to prevent the boards from sagging. I had to spend the next four hours unscrewing every single joist hanger and shifting them. I sat in the dirt and almost told her to just call the contractor back to finish it. She just handed me a Gatorade and told me to get back to work. That’s the tag-team energy that keeps this house standing. It was just like when we did the $650 DIY chicken coop build—we made the same kind of 'autopilot' mistakes there, too. Apparently, we need to do everything the hard way at least once.
The Final Tally: Where Did the Money Go?
We finished the last of the railing in mid-April, just as the North Carolina spring was hitting full force. Here is the actual breakdown of what we spent versus that $18,420 quote we got back in January:
- Lumber and Decking: Around $3,200 (Pressure-treated frame + composite boards)
- Hardware and Concrete: Mid-hundreds (Bolts, hangers, and 12 bags of concrete)
- Permits and Inspection: Roughly $150 (Don't skip this—it makes the house easier to sell later!)
- New Tools: Low-three-figures (A decent miter saw and a laser level)
- The Plans: Under seventy bucks (A drop in the bucket compared to what they saved us)
Total Spent: Mid-four-figures
Total Saved: Over $14,000
That is fourteen thousand dollars that stayed in our bank account because we were willing to be tired for a few months. We didn't just get a deck; we got the confidence to start the next project. Actually, I think I saw her looking at plans for a full workshop yesterday. God help my lower back.
Is DIY Right for Your Deck?
Look, we aren't saying everyone should go out and build a 10-foot high raised platform. If you are afraid of heights or you don't know which end of a hammer to hold, maybe start with a garden bed. But if you have got a bit of grit and a partner who doesn't mind holding the other end of a heavy board, you can absolutely do this. The key for us was having a roadmap. We didn't have to guess if the structure was sound because the engineering was already done for us in the blueprints.
If you are looking to start your own backyard transformation, I can't recommend TedsWoodworking enough. It gave us the confidence to stop being 'the people who talk about building things' and finally become the people who actually build them. Now, if you will excuse us, we have a savings account to go stare at while we drink a beer on our brand-new, perfectly level, DIY deck.